
Whiteout Survival Winter Siege
Winter Siege in Whiteout Survival is an alliance battle over connected strongholds, defended by registered squads and their Wardens. Prepare both squads before the setup locks, then coordinate attacks to remove whole enemy garrisons and their Stars. Checked in November 2026.
Squads Before Preparation Ends
Winter Siege requires Furnace level 25 and an alliance within the state's top 20 by power. Membership at matchmaking determines eligibility. Before building a detailed attack plan, make sure the alliance roster and the players preparing squads meet those entry rules. Use the Furnace upgrade guide if you still need the building requirement.
Each chief registers 2 squads, and both squads serve in defense and attack. They are not permanently divided into a defense-only team and an attack-only team. Guides recommend filling the available Deployment Capacity and preparing each squad around the heroes and equipment it actually has rather than forcing identical builds.
The event provides troops using the highest unlocked troop and Fire Crystal levels. Squad setup includes the heroes and troop distribution you register. Complete both formations during Preparation because troops and heroes lock when that phase ends. Save the plan early enough to review an empty slot, a wrong hero or an unfinished ratio before the deadline.
Phases and Scouting
The event follows Preview, Matchmaking, Preparation, Scout, Battle and Results. Use the phase timer on your account for actual dates. This sequence explains when to check the roster, when to finish setup and when to choose targets, without treating a short description of the operation as a fixed duration for every part of the event.
| Phase | Listed UTC window |
|---|---|
| Preview | Monday 00:00 to Tuesday 23:00 UTC |
| Matchmaking | Tuesday 23:00 to 24:00 UTC |
| Preparation | Wednesday and Thursday UTC |
| Scout | Friday UTC |
| Battle | Saturday UTC |
| Results | Sunday UTC |
During scouting, build a route plan rather than a list of unrelated defenders. Clearing every garrison squad in a connected preceding stronghold opens the next one. A difficult squad on that path can therefore matter more than an easy target elsewhere. Officers should identify the blocked route and tell members which defenders need concentrated attacks.
Warden selection belongs in that preparation review. Officers choose from the eligible squad pool displayed for the stronghold. Check that pool directly instead of assuming every powerful squad across the alliance can be appointed anywhere. If no Warden is chosen by Scout, the strongest garrison squad is appointed automatically, so leaving the choice unfinished still has a result.
Hearts, Morale and Stars
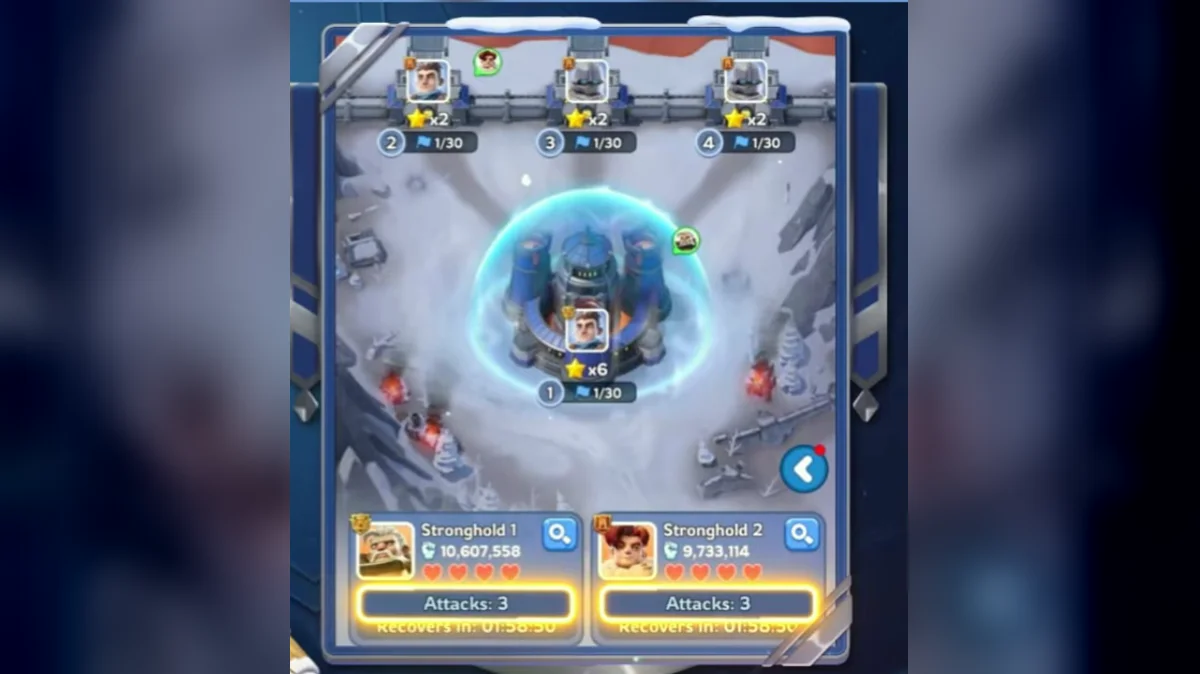
Ordinary defenders have between 4 and 5 Hearts, while Wardens have between 5 and 6 depending on the event rules for the server. Read the Heart display on the selected defender before committing a sequence of attacks. A familiar-looking formation can still require a different number of successful hits.
Every defensive defeat removes 1 Heart. The defender's contributed Stars disappear only after its last Heart is lost. This makes complete squad removal the meaningful scoring step. Spreading hits across several healthy defenders can use a large share of alliance attack supply without producing the Star reduction that opening a route requires.
Attackers fight at 100% Morale. A defender's Morale falls as it wins defensive battles, and losing a Heart restores its Morale to 100%. The reduction schedule and floor follow the event's rule panel. Read those values before planning how many weaker attacks to use, since the Morale floor governs how far that tactic can soften a target.
The result depends on enemy Star removal and surviving defenses. Use the event's victory and tie-break panel when the scores are close, especially for tied or zero-Star results. Keeping your own Stars while finishing complete enemy squads gives the alliance a concrete goal without relying on a single tie-break summary.

The video explains the Winter Siege map, strongholds and squads, how attacks and hearts work and how the winner is decided.
Attack Supply and Strategy
Every squad begins with 3 attack attempts. It recovers another every 2 hours, up to 7 recovered attempts and 10 total attempts per squad over the battle. Count those charges before assigning a sequence. Available supply places a hard limit on how often the alliance can try to soften an unbreakable defender.
Guides recommend attacking as a group, finishing a selected enemy squad and then clearing its stronghold. Assign a player to check the target state between hits. That avoids sending several planned attacks after the intended defender is already gone or after the route plan has changed. Communication should specify the target and current goal, such as taking the last Heart.
A weaker attack can reduce Morale when the defender wins, allowing a stronger teammate to attempt a Heart afterward. Guides recommend reserving this tactic for defenders that block progress rather than spending the whole supply on repeated losses. Compare the number of charges the plan consumes with the remaining Hearts and the next stronghold you need to reach.
Choose the alliance objective before personal rankings. A hit that earns individual activity but leaves every target partly defended may do less for the result than finishing a nearly removed garrison. Ask which squad opens the route or removes Stars now, then choose an attacker capable of contributing to that goal.
Troop Ratio and Formation
Guides recommend tuning the two squads separately. Their hero skills and equipment may support different ratios on the same account, so an Infantry-heavy first team does not force the second team into the same mix. The examples below are candidates for testing, not a single event rule that every participant must follow.
| Suggested mix | Infantry | Lancers | Marksmen |
|---|---|---|---|
| 1 | 60% | 40% | 0% |
| 2 | 48% | 4% | 48% |
| 3 | 50% | 20% | 30% |
| 4 | 40% | 20% | 40% |
Guide examples include Greg, Alonso or Bradley when the Marksman hero supplies useful all-troop skills, and Molly or Mia in low-Lancer formations. Treat those as skill-based suggestions tied to the heroes available to you. Review the hero list and the ratio reference before committing both teams to a borrowed composition.
Some outside bonuses do not apply, including Hero Exclusive Gear Skills, Territory bonuses, State Positions, President Skills, City bonuses and Frostdragon Tyrant Titles. Separate the event's accepted stats from your normal city combat expectations. A formation should be judged in the conditions where it will fight, with its registered heroes and the event's own rules.
Winter Merchant and Rewards
Winter Badges are redeemed at the Winter Merchant. Event rewards include Victory Rewards, Win Streak Rewards and Loss Rewards; a separate stronghold reward becomes claimable when all its defending squads are defeated. Members must be in the alliance at reward tally, so collect the result before treating an alliance move as finished business.
| Merchant item | Winter Badges | Listed limit |
|---|---|---|
| Refined Fire Crystal | 1000 | 1 |
| Fire Crystal Shard | 30 | 50 |
| Fire Crystal | 50 | 30 |
| Charm Design | 100 | 50 |
| Charm Guide | 100 | 25 |
| Mythic General Hero Shard | 500 | 3 |
| Essence Stones | 250 | 10 |
| 100 Enhancement XP Component | 100 | 20 |
| 1h General Speedup | 80 | 20 |
| 1h Construction Speedup | 80 | 20 |
| 1h Research Speedup | 80 | 20 |
| 1h Training Speedup | 80 | 20 |
Read price, available quantity and the shop timer together. A listed limit is a purchase cap, not proof of how often that cap refreshes. For shopping, compare the material needed for your next upgrade with the alternatives in the table. Refined Fire Crystal, Charm materials and Hero Gear supplies serve different development plans.
Keep the reward goal separate from the battle plan. Buying a useful item afterward is valuable, but it does not justify wasting the alliance's charges during a close result. Finish the assigned targets first, claim the rewards available to your account and then decide which merchant exchange advances the next upgrade you want.
Frequently Asked Questions
Can I switch alliances after matchmaking?
Eligibility is tied to the alliance you belong to when matchmaking starts. Moving to another alliance does not transfer your Winter Siege place to that team; the eligibility rule requires returning to the original eligible alliance. Check membership before matchmaking, and keep the separate reward tally condition in mind before leaving after battle.
Does sparring count toward rankings?
Sparring is excluded from Carnage and Wins leaderboard scoring. Treat practice as a way to examine a formation instead of expecting it to raise those event totals. The leaderboards measure different actions: enemy troop losses, removed Stars, attacking victories or reduced Morale. Choose a battle objective for the alliance before chasing an individual ranking.
Does a Warden lose Stars immediately?
A defending squad loses one Heart when defeated, but its contributed Stars stay until the final Heart is gone. Wardens have five or six Hearts depending on the server rules shown in the event. Several successful hits can therefore be necessary before a defended position produces the Star reduction your alliance needs.
Should I buy speedups or materials?
Compare the upgrade you need with the Winter Merchant prices. A one-hour speedup costs 80 Winter Badges in the listed offers, while a Charm Design costs 100 and a Fire Crystal Shard costs 30. Guides recommend choosing a purchase that supports your current development goal.
Read Next
Compare other alliance formats in Alliance Championship and Foundry Battle, then check the events list for your next activity.